As I outlined in Iterations of this Site, a time had come when I wanted to repurpose this domain, and use it to share some of the knowledge I had gained from experimentation and projects I had worked on.
A common approach that a lot of people recommend is using a static site generator like Jekyll or Hugo, pushing that to a GitHub Pages repository and then using Cloudflare Workers to mask that behind a domain name of your choosing.
I really liked the approach, and it made some vast improvements over my previous methodology. But it would mean that a lot of the little easter eggs I had developed over the years would be lost.
I came up with an ideal solution; I’ll shift the website from a standalone virtual machine into a docker container, then I can build out an automated process to build it and deploy it. My infrastructure was already hosted on Google Cloud Platform, and I had quite liked it so far, so I opted to continue using it.
There wasn’t a great deal of information about how to accomplish that, so I thought I’d document and publish it myself to help others.
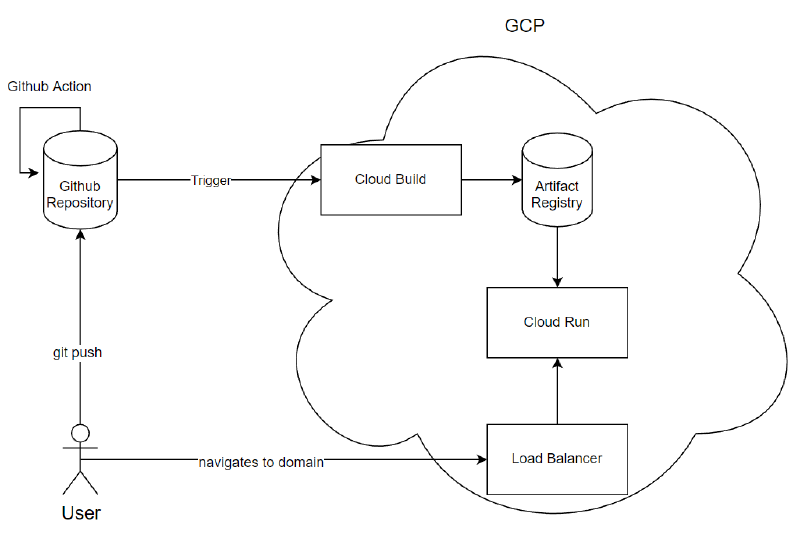
There are five key components to this:
- Github Reposity: where code is stored, including the
Dockerfileandcloudbuild.yaml - Cloud Build: The CI/CD pipeline for building the Docker image.
- Artifact Registry: Where built Docker images are stored.
- Cloud Run: The GCP platform that runs Docker Images from the Artifact Registry.
- Load Balancer: We don’t necessarily want someone to access the Docker container directly, so we put it behing a Load Balancer to access it.
Step 1 - Build the Docker Image #
To build a Docker image we need a few key components:
- First we need a Github repository where we have some code.
- Next we need some instructions of what the Docker image should look like and do.
- Finally we need instructions on how to build the Docker image, where to store it and how to run it.
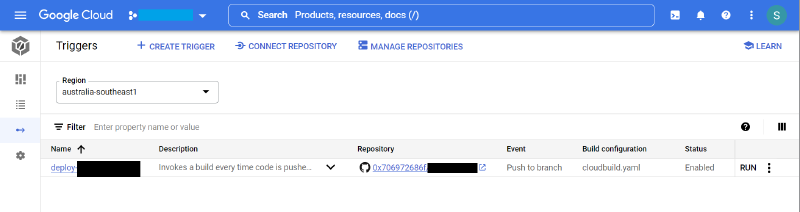
For the first part from within Cloud Build we need to create a trigger, this trigger will require authorisation to a Github repository but will monitor it for changes. When a change occurs it’ll read in a file specified in the trigger (by default Cloudbuild.yaml), and undertake the actions there.
If you want to fully optimise and automate the entire process you can have multiple branches in your github repository. What this means is you can push to a development branch, and when satisfied push to another branch. The bigger advantage to this is you can use a Github Action, which will build the pages for you, instead of you manually having to as part of your process.
My Docker container is a relatively simple one, I’m leveraging the nginx container, and copying the configuration and HTML files that are in the repository into the
FROM nginx
COPY ./html /usr/share/nginx/html/
COPY ./shadow.engineering.conf /etc/nginx/conf.d/shadow.engineering.conf
ENV PORT=8080
EXPOSE 8080
CMD ["nginx","-g","daemon off;"]
Then to tell Cloud Build how to put it all together I have a cloudbuild.yaml file, it has 3 steps:
- Use Cloud Build to build the Docker container
- Use Cloud Build to store the built container in Artifact Registry
- Deploy the Docker container in Cloud Run.
steps:
  # Docker Build
  - name: 'gcr.io/cloud-builders/docker'
    args: ['build', '-t', '$LOCATION-docker.pkg.dev/$PROJECT_ID/$REPO_NAME/$PROJECT_NAME:$SHORT_SHA', '.']

  # Docker push to Google Artifact Registry
  - name: 'gcr.io/cloud-builders/docker'
    args: ['push', '$LOCATION-docker.pkg.dev/$PROJECT_ID/$REPO_NAME/$PROJECT_NAME:$SHORT_SHA']

  # Deploy to Cloud Run
  - name: 'gcr.io/cloud-builders/gcloud'
    args: ['run', 'deploy', 'app-project-www-${SHORT_SHA}', '--allow-unauthenticated', '--image=$LOCATION-docker.pkg.dev/$PROJECT_ID/$REPO_NAME/$PROJECTNAME:$SHORT_SHA', '--region', '$LOCATION', '--platform', 'managed']


# Store image in Google Artifact Registry
images:
  - $LOCATION-docker.pkg.dev/$PROJECT_ID/$REPO_NAME/$PROJECT_NAME:$SHORT_SHA
Step 2 - Check Build Status #
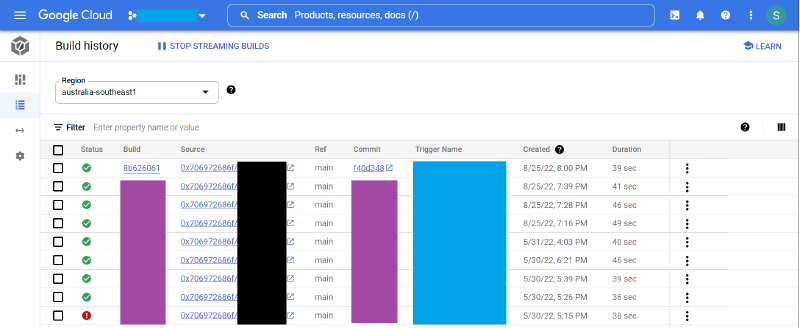
We’ve built our pipeline, we’ve told it what we want to do, now we need to check that it successfully happened. Maybe there was an error in the Dockerfile or cloudbuild.yaml files. From the Cloud Build we can check the dashboard for a quick overview, and viewing the history on the left go into the full build. In here we’ll see logs and more details of the buiid, useful if it failed to build.
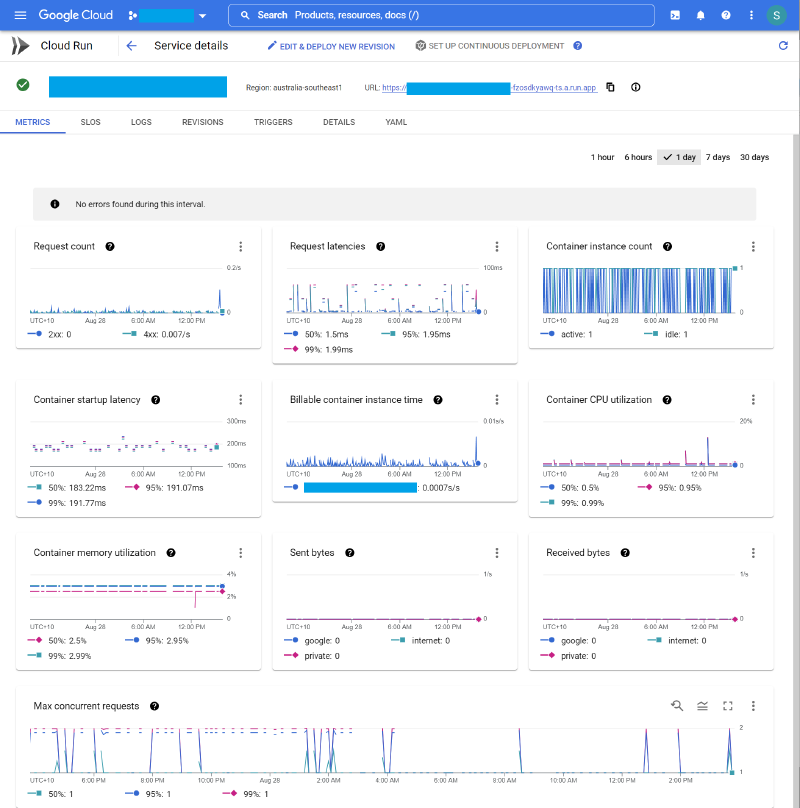
Next we need to see that it’s successfully running, and for that we pivot over to Cloud Run. We can see if the service is running and clicking on it can see details like the Application URL, and traffic volumes. If we can connect to the app URL, we can confirm that it’s successfully all up and running.
Congratulations you’ve just built your own CI/CD pipeline, and Docker instance and it all works! If it doesn’t, the logs can be a godsend to help with guidance.
Step 3 - Internet Connectivity #
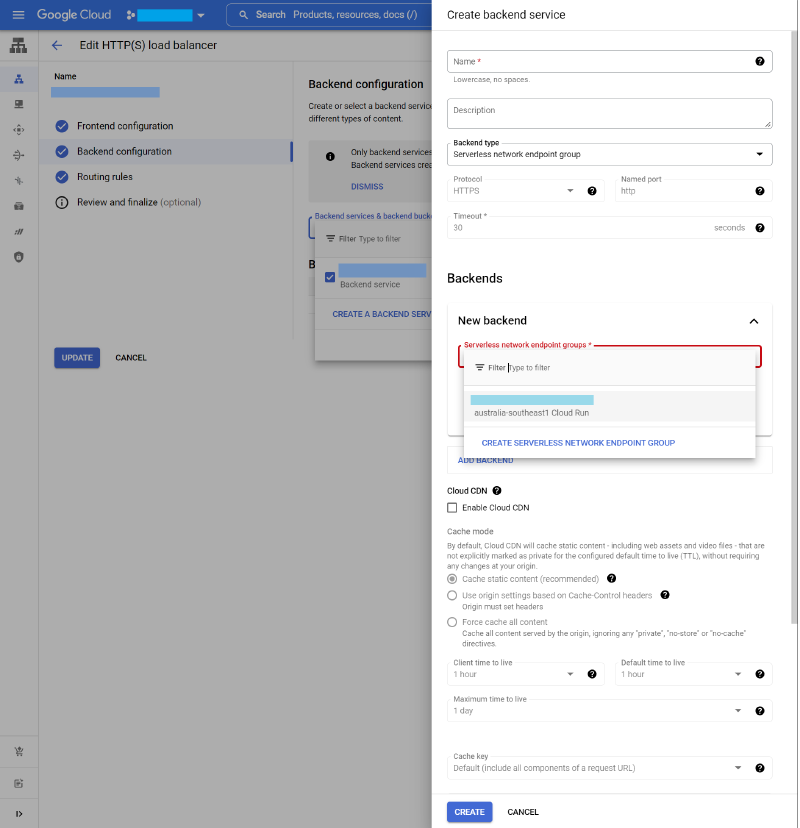
Finally we have a Docker container that’s built, and running successfully. We’ve checked the Cloud Run dashboard and successfully been able to connect to the APP URL. But now we need to have our domain to resolve to the address of our docker container. To accomplish this we use a Load Balancer.
By Creating a HTTP(S) Load Balancer we can provide it an external facing IP address and connect it to our internal Docker application through a Serverless Network Endpoint Group. There’s quite a few advantages to the load balancer, you can use it as a CDN to distribute your pages across the world for a quicker response, you can provide it with an SSL certificate (that it’ll manage and maintain), including a LetsEncrypt certificate, and you can control the Crytographic Algorithms (such as allowing TLS 1.0 vs TLS 1.3).
We can also use it to capture JA3 signatures, and capture logs (instead of nginx directly).
Step 4 - Relish the Joy of Success #
Congratulations you now have yourself a website.
Unfortunately that’s not the end of it though, you can make additional improvements. This could be using Github Actions to help automate parts of the early push and build process, implementing uptime monitoring, or just maybe add some simple easter eggs.
Hopefully you found this useful and you can build some cool things!
⬆️⬆️⬇️⬇️⬅️➡️⬅️➡️🅱️🅰️↩️